Content Overview
- Content Overview
- What amp settings should I use?
- Do I include the boosters/speaker cabinet/cab sim in the chain?
- Recommendation
- Deliberately including speakers in the chain
- Bad practice: two cabinets or no cabinets at all
- Use a suitable input.wav file
- Download the official input.wav file provided by MOD Audio
- Match file size, WAV format and rates
- Creating your own input.wav file
- Try to match db peaks and aim for a -6db peak
- Different training models; from “very light” to “heavy”
- What kind of models to deliver? Different qualities? Different gain settings?
- What does “validation patience limit reached” mean?
- Using your MOD Audio device for re-amping a pre-amp/pedal
- Creating a pedalboard for re-amping
- ESR Values: What is the accuracy of your model?
- High ESR? Check for misalignment issues
- About the author
- Epilogue
Orientation
This article is meant for everybody who started experimenting with the AIDA-X modeling technology and tried to create a first model.
If you go through these steps, you will encounter some exotic terms, modelling options and different methods to achieve the same result. Perhaps you ran into some sub-optimal results. This article will guide you through some of these subjects and issues
What amp settings should I use?
“These go to eleven…”
Try setting the amp you are modelling to the settings you like. You still have options to tweak the EQ before or after the model, even within the AIDA-X plugin.
However, I would recommend not going to extremes with high-gain amps. The highest gain settings start to introduce a lot of noise. I’ve modelled pretty heavy amps, and I always dialled them in on the settings I needed, which involved very high gain.
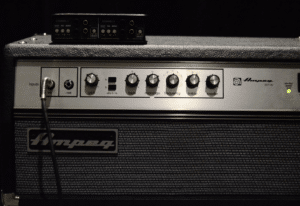
Some amps can get very noisy, and dialling back just a little can make a difference in the quality of the model.
Do I include the boosters/speaker cabinet/cab sim in the chain?
Recommendation
Community members, myself included, have found that you still get the best results capturing the character if you limit the modelling to just the amp and nothing more. It is also harder to get a good sound from “Cab included” models; they require a “Heavy” training model and yet again it is no guarantee for a quality sound.
That’s why we recommend capturing one amp, pedal, … at a time instead of complete chains.
If you DO plan to share models that include pedals and/or speakers sims, remember to provide at least one model without any speaker cabinets in the chain. This offers the most flexibility to other users when choosing their favourite cabinets.
Sharing both the “cab less” and “cab included” models is a nice extra, but in practice, most users will go for the “cab less” model. This also includes boosters. It’s a popular practice to put a variation of a Tube Screamer or a Klon clone in front of an amp, but try to exclude this from your model.
AMP ONLY
+ more flexibility
+ less combinations to model
+ sounds great, even on lighter training modes
AMP+CAB (+BOOST)
+ Easy to deploy same chain
-“Heavy” training needed and still the model isn’t always a success
– less flexibility
Deliberately including speakers in the chain
You could experiment with including the speaker (sim) and even your booster pedal in the chain. If you can get the model to sound right, it can help you simplify your workflow. The developers noticed that it takes the heaviest training model and yet again it is no guarantee for a good sound.
With a bit of luck though, you might end up with one model that includes several components in one model; You’ll need less setup time figuring out the settings.
Live artists should keep their flexibility in mind when going for “cab included” models. A possible scenario could be a situation where you need to switch from “straight into the mixer” to playing over a real cabinet or vice versa.
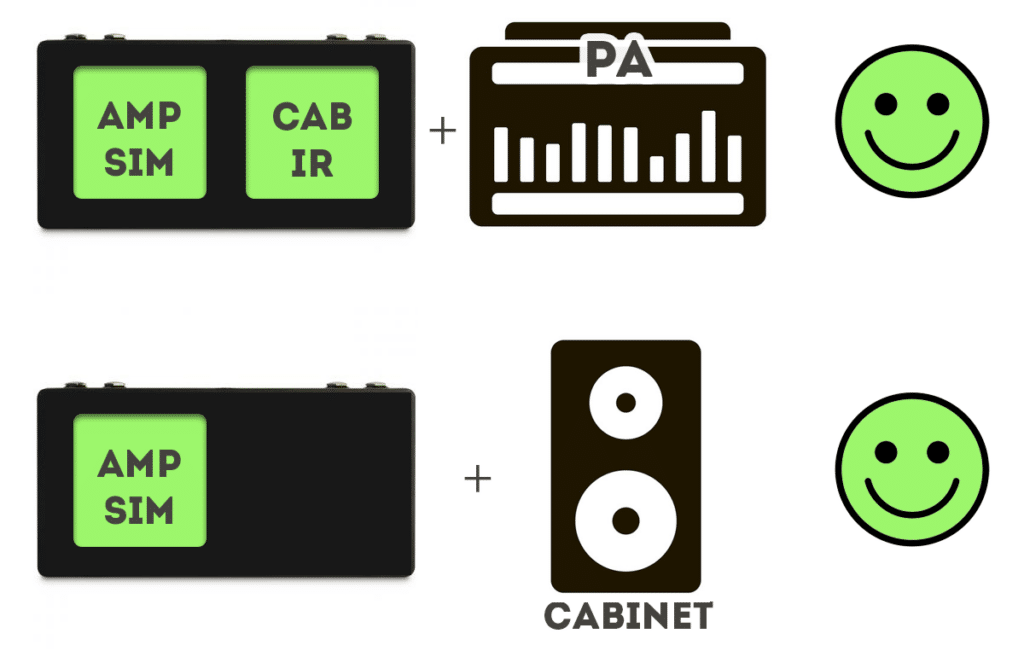
Stay flexible!
Stay flexible by adding a cabinet simulation, tied to a button on your MOD device so you can always turn that on or off in situations like described above. In that setup, a “cab less” amp model is optimal. You can also create separate pedalboards. That takes more effort to set up but gives you more options to tweak separate sounds when going for “cab included” models.
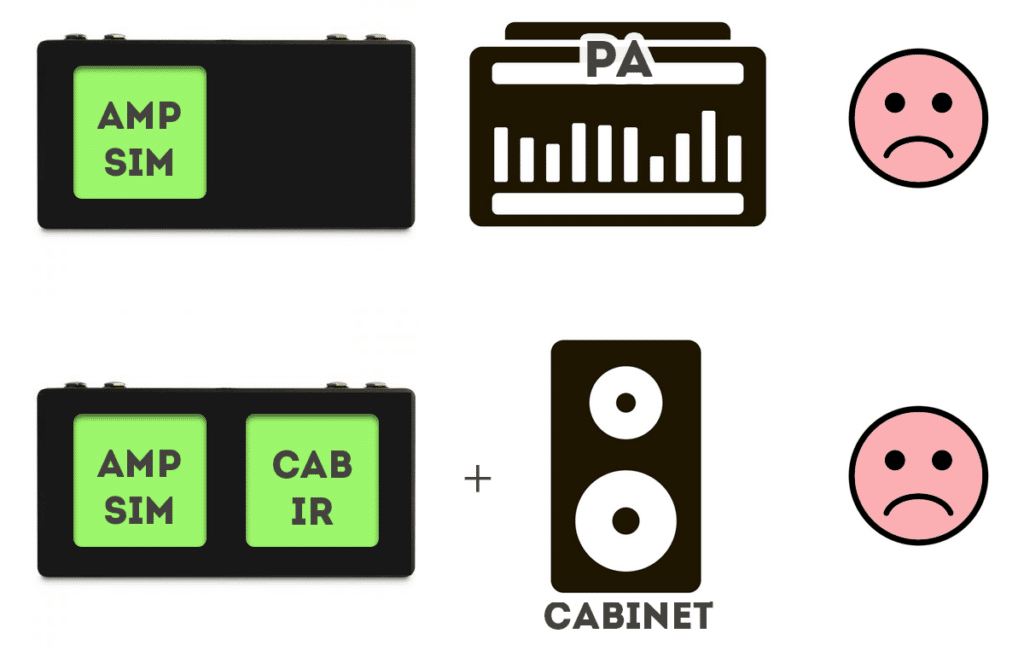
Bad practice: two cabinets or no cabinets at all
Two stacked cabinets Mushy sound
No cabinets = Harsh sound!
When the speaker (sim) sound is a part of your chain on a pedalboard to go straight into a mixer, it will sound mushy going through a real cabinet. The double cabinet sound isn’t desirable, and I speak from rehearsal room experience when I say you probably won’t like it.
The other way around is no fun either. When your pedalboard relies on a real-life, external cabinet and for some reason it is unavailable and you need to go straight into a PA, you won’t enjoy your tone either.
Small venues often only amplify vocals and rely on the amplifiers of the artists’ instruments, so always make sure you build in enough flexibility in your live rigs.
Use a suitable input.wav file
MOD Audio provides an input.wav file suitable for modelling. It contains a variety of sounds, frequency ranges, harmonic tricks and playthroughs of different kinds of sections you might find in a song.
It is your best option if you want to introduce a broad range of sounds to your amp to translate in his or her own language. (Do amps have a gender? Ok, not going there…)
Download the official input.wav file provided by MOD Audio

Match file size, WAV format and rates
Make sure your input.wav and target.wav files are the exact same size, both in WAV format and have the same rate.
The modelling will only work if both your files are at 48000hz (=48Khz) in WAV format. The whole process is designed to work on this sample rate and aligns all the way down to sample level.
You will notice that many DAW’s have different standard settings like 44100hz so keep in mind to check your export/render settings.
Creating your own input.wav file
I took the liberty of adding my own section of long chords and fast chord chugging to the file. It makes the file longer but I noticed it offered a slightly better result on some of the high gain simulations. I have yet to prove its result but since some of my models will be used in a band that plays in “drop C# tuning”, it won’t hurt adding a section of that to my file.
Making the WAV files longer makes them larger in size, which quickly has an impact on the upload time when going through the training process.
Try to match db peaks and aim for a -6db peak
It could be changed by the time you are reading this but at the time of writing this article, the advice stands: Try to have a maximum peak of -6db in your target.wav file when you render. Having both input and target file on peaks of -6db *could* help the accuracy of the model. I’ve heard the team considered to handle this automatically during the modelling process at some later time.
This recommendation is made because the pregain can be adjusted up to +6db. This is not that crucial because the out gain can be adjusted in the json file produced by the training but it is of course a more clean practice to avoid that.
Check the peak db when you create your render to know this peak. Most DAW’s show this value in the render window. Doing this, you mitigate some of the risk of your model being abnormally loud or silent.
Different training models; from “very light” to “heavy”
The training comes in different quality ranges. A heavier model results in heavier CPU usage.
Notice how the Lightest model uses just over half of the CPU power the Heavy model needs on a Mod Dwarf.
So far, the MOD Community hasn’t noticed a lot of difference between Standard and Light models. Heavy vs. Light is more noticeable but certainly not on all kinds of amps. Hear for yourself as the difference isn’t all that much, especially on high gain models!
Training models
- Lightest: 25% CPU
- Light: 30% CPU
- Standard: 37% CPU
- Heavy: 46% CPU
Don’t be mistaken, a “Light” training model doesn’t mean “low quality”
If you consider the lower CPU usage of this kind of model and its impact on your pedalboards for live use, you might be surprised with the result of the lighter settings. I’ve been using the Standard models so far and if you are using the model on a high end computer as part of your effects chain in a DAW, you can easily switch to the Heavy models if you want to. Then again, can you hear the difference between Standard and Heavy on your modelled amp?
What kind of models to deliver? Different qualities? Different gain settings?
The default setting, “Standard”, is the best options if you want to create just one model.
My idea is that the Community has more use of having different settings, all created on “Standard” quality than having just one setting in 4 qualities.
This is probably the most efficient idea if you want to deliver a different range of settings, like a low gain, medium and high gain setting. An amp specific mode or setting is always a useful one to include as well. (some amps have specific modes, channels and boosts). In that case, it might become a tedious job if you want to include different “quality” levels for each setting.
When you are modelling just one setting on the amp, the best Community service would be to deliver the whole set of qualities, from Lightest to Heavy.
When going for two models; I’d go for Standard and Lightest or Heavy and Light (both having a setting between them.)
What does “validation patience limit reached” mean?
When training a model, the process can stop before it has reached the chosen amount of iterations. You’ll get the message “validation patience limit reached”. This message means that the model is not getting any better and instead of running until the end it stops; it isn’t learning anything new anymore.Basically saving you the time with the same result of doing all the iterations you selected.
Using your MOD Audio device for re-amping a pre-amp/pedal
!! MAJOR WARNING !!
* NEVER use the speaker output of an amp to go into your MOD device. It is literally powered up to physically drive speakers.
* If you want to model an amp, you might prefer to limit yourself to the PRE-AMP SECTION.
The output of the pre-amp section can be tapped from the “FX send” (or similar) output. This has low power and it’s suitable for sensitive electronic gear (since you use that one as effects loop of an amp).
* If you insist on modellign the POWER AMP section of your amp as well, you mus use specific gear like a loadboax, physical speaker sim with low powered output etc.
* This guide is aimed at people modelling only the PRE-AMP section or pedals.
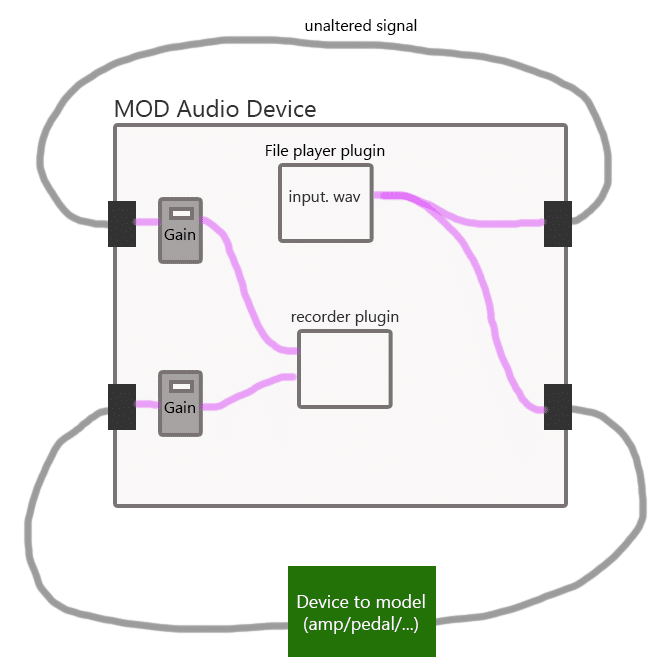
I often use my MOD Dwarf as a tool to both play and record files to create the target.wav file.
I let 1 signal go round in an unaltered fashion and the other goes through the device I want to model.
The main reason for this is corresponding latency alignment and file size. This means I re-record the original input.wav again, next to the target when I press record.
Both dry and wet files go through the same amount of conversions; first 1 step of digital-to-analog and then 1 step of analog-to-digital. The conversion introduces a bit of latency. This way my input and target will always have the same size and there will be no latency shift on one of both tracks.
The process is simple
> I press play on the file player
> I check the levels on the little displays of the gain plugins right after input 1 and 2.
> I adjust the outgoing level on the device I’m modelling to match the level with the dry signal somewhat, making sure it isn’t clipping and showing somewhat the same behaviour has the input, level wise
> I make the recording by stopping the file player, pressing record and starting the audio player again.
> Stop recording when the file is done. Don’t worry if the file already started over again, since your recording includes both dry and wet track, you will always have the same file length.
Creating a pedalboard for re-amping
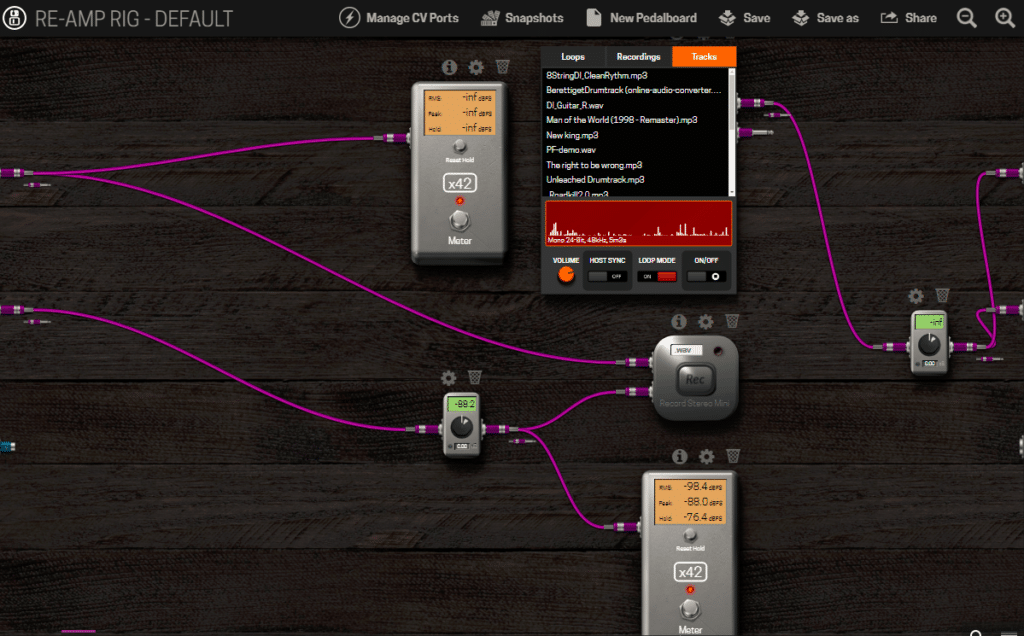
Plugins to use in this process
After you upload the input file to your MOD Device, you can use it in the File Player.
I use one of Brummer’s file recorders to record the target.wav AND an unaltered input.wav. This plugin can be found in the pedal library for you to download via your Mod device’s interface. You can use either the 4-input recorder or the regular stereo recorder and let the dry (original) signal some in on L and the wet (amped) on R and split them later in your DAW. I find Audacity the easiest tool to split a stereo track to two mono tracks afterwards.
The TinyGain plugins are easy to use and feature a little display that helps in having an indication of the levels
ESR Values: What is the accuracy of your model?
ESR= Error to Signal Ratio.
The ESR is a value that expresses the accuracy of your model. It is a number ranging between 0 and 1. The closer the number gets to 0, the higher the accuracy of the model.
ESR quality guide
| 0 | Absolute zero, impossible to achieve |
| 0 -> 0.05 | Great success |
| 0.05 -> 0.15 | Good, accuracy still within the comfortable limits |
| 0.15 -> 0.2 | Slightly noticeable difference in some cases but probably still a very usable model |
| 0.2 -> 0.35 | Make sure you do listen well. This will be a usable model but it is possible the amp sounds more like a “sister amp” than the actual amp. |
| 0.35 ->0.5 | Could be better, it might pay off trying again after checking all the steps again |
| >0.5 | Make sure all your parameters were taken care of, as these values. Chances of having a usable model are slim |
| >0.9 | Failed, check the levels and alignment or try re-amping again from the start. |
High ESR? Check for misalignment issues
The current version of the training algoritm automatically detects the two short peaks in the beginning of the input.wav file so misalignment should not be an occuring issue. If you keep getting very high ESR values (0.7 and higher), try the procedure below to manually align input.wav and target.wav files
Several Community users noticed that misalignment issues can occur when creating the target.wav. This can have several causes and usually latency is the cause of the issue. Latency can occur if you have digital-to-analog and analog-to-digital conversion, latency on effects chained in your DAW etc.
You can check this by importing both your input.wav and target.wav in your DAW. Zoom in as far as you can and you will end up looking at your signal on sample level. It will look like this:
(screenshot by Community user Itskais, member of the MOD Audio team)
The screenshot already zoomed in on the absolute beginning of the input.wav file. Above, you see the input.wav and below the target.wav.
Do you see the 2 short peaks? Those 2 pops are especially created to help the algorithm align the signals. It works like a clapper used in movie production, to align image and sound tracks.
User Spunktsch, part of the MOD crew, sometimes adds a standard “click” sound in Reaper. Look how the clean sine wave, consisting of samples of various heights, is being changed into a square shaped sound in the target.wav.
(screenshot by Spunktsch)
If you look carefully, you’ll notice the green line denoting the start of the cycle. If you notice that your files.
User Jandalf on the Forum came with this handy idea to align waves: he could fix it by aligning a zero crossing on both signals. Meaning: he looked for a spot where the input signal switched from negative to positive signal values. Then he took the target signal and shifted it forward until the zero crossing of it was at the same sample as the one on the input signal.
An example of bad alignment
Zoom out a bit again. This screenshot shows a clear misalignment. In the target.wav, the first “pop” still needs to happen when the first one occurred. Try adjust the position of your target track to the waves align.
Identifying the wave shape for precise alignment
Mind you, identifying the start and end of a wave isn’t all that easy. Take a look at the screenshot by Itskais again. This is the result of a successful re-amp process and considered a valid match. Although the target wave seems to start earlier (going down a bit), most of the stronger bit above the line matches up…but not completely.
Introduction of harmonics in the distortion, behaviour of he amps, etc and other aspects of the process can make it harder to identify alignment but notice the sheer difference between the screenshot below, where you’re talking about samples while in the example above, you are talking in terms of time

About the author
Lieven De Vleeschouwer is a Belgian singer and guitarist.
He sings and plays guitar in the Heavy/Thrash metal band Point Fifty and does solo gigs as the Devil’s Advocate. You might have met him in his role as JustinGuitar Official Guide, Approved Teacher and Community Admin
Find him on the MOD Audio Forum as LievenDV
Epilogue
“Imagine having an algorithm learning how an amplifier or pedal works based on comparing a dry and a processed sound… You could sound like every amp”
LievenDV, August 1999
Fast forward almost a quarter of a century to a time where the terms “AI”, “Neural Networks” and “Machine Learning” become trivial though we don’t always understand how it works. Is that an issue? Not at all, since the bright people of AIDA and MOD Audio have made the technology accessible for mere mortals and guitar gods amongst us.
I’ve heard (of)modelling before and some brands made their name by selling pretty accurate models and an expensive way to model gear yourself. The concept isn’t new but it has been a while since a disruptive player emerged on that market.
When NAM caught traction, you no longer needed expensive hardware but you still rely on the processor power and DAW software on your computer. Modelling became accessible and very affordable.
The next breakthrough came from AIDA dsp and MOD Audio, offering open source technology on relatively cheap and mostly a very portable and gig worthy device, the size of a big guitar pedal… and here we are, living the dream I had in 1999!
